全面总结之 Service 篇
什么是服务
服务也是 Android 常用的组件之一,它没有界面,一直处于后台默默的工作着。
正因为服务一直存在于后台,所以我们可以使用服务去执行一些不需要和用户交互、不需要用户界面、需要长期运行的任务,例如播放音乐、下载上传等等。
需要注意的是,服务并不是独立的,当 App 的进程被杀死,那么该服务也会随之消失。
还需要注意的是,虽然服务是运行在后台,但并不代表服务是运行在别的线程中,服务依旧是运行在主线程内,我们的耗时操作,依旧需要在新线程中执行耗时任务。
服务的分类
按照运行地点可以分为:
本地服务(Local Service),主要用户程序内部,依附在主线程上,。
远程服务(Remote Service),主要用于 Android 系统内部的应用程序之间,独立于主线程,对应进程名格式为所在包名加上你指定的
android:process字符串。由于是独立的进程,因此在 Activity 所在进程被 Kill 的时候,该服务依然在运行,不受其他进程影响,有利于为多个进程提供服务具有较高的灵活性。。
按照运行类型可以分为:
前台服务,会在通知栏显示 Notification 的服务,当服务被终止时,Notification 也会随之消失。
后台服务,所有内容均运行在后台,没有任何前台内容。
按照使用方式分类:
startService 启动的服务,主要用于执行一个后台任务,不和前台产生通信,通过 stopService 停止服务。
bindService 绑定的服务,需要和前台产生通信的服务,需要通过 unbindService 来停止服务。
同时使用 startService 和 bindService 的服务,停止服务应同时使用stopService与unbindService。
服务的基本用法
创建 Service 的子类
创建我们的服务,只需要让我们的类继承 Service 就可以,我们需要实现其 onBind、onCreate、onStart(已废弃,不建议使用)、onStartCommand、onDestroy 方法并在其中实现我们的业务逻辑。
在清单中注册服务
创建好类之后,还不能直接使用,和 Activity 一样,需要在清单文件中进行注册,需要在 <application/> 元素中添加 <service/> 子元素即可。
同时我们也可以在清单文件中为该服务设置 intent-filter 来确定哪些 Intent 可以启动该服务,还可以设置一些其他属性,详情参阅:清单文件 - service。
启动服务
在创建好服务之后,我们就可以来启动服务了,最常用的启动服务的方法和启动 Activity 一样直接调用 startService 方法,通过 Intent 确定我们要启动哪个 Service
Intent startServiceIntent = new Intent(this,MyService.class);
startService(startServiceIntent);
在启动服务之后,会依次调用我们创建的服务的 onCreate、onStartCommand 方法。
绑定服务
很多时候我们需要 Activity 和 Service 进行通信,这个时候就需要借助 Service 中 onBind 方法了,我们通过绑定服务来使用 Binder 对象来实现 Activity 和 Service 之间的信息传递。
要想绑定服务,只需要调用 bindService 方法即可,该方法需要三个参数:
第一个是指定我们需要启动的 Intent 对象,用于显式命名要绑定的服务(但 Intent 可能是隐式的)
第二个参数是一个 ServiceConnection 对象,我们实现该对象需要重写它的两个方法
onServiceConnected,系统会调用该方法以传递服务的 onBind() 方法返回的 IBinder。
onServiceDisconnected,Android 系统会在与服务的连接意外中断时(例如当服务崩溃或被终止时)调用该方法。当客户端取消绑定时,系统“不会”调用该方法。
第三个参数是一个指示绑定选项的标志。它通常应该是 BIND_AUTO_CREATE,以便创建尚未激活的服务。其他可能的值为 BIND_DEBUG_UNBIND 和 BIND_NOT_FOREGROUND,或 0(表示无)。
在我们调用 bindService 绑定一个服务的时候,会去调用我们服务的 onBind 方法,该方法会返回一个 Binder 对象,我们可以在 ServiceConnection 对象的 onServiceConnected 方法中获取到这个对象,也就完成了 Activity 和 Service 的通信。
例子:
MainActivity.java
public class MainActivity extends Activity {

    private Button bt_bind, bt_unbind;
    private TextView tv;

    @Override
    protected void onCreate(Bundle savedInstanceState) {
        super.onCreate(savedInstanceState);
        setContentView(R.layout.activity_main);

        bt_bind = (Button) findViewById(R.id.bt_bind);
        bt_unbind = (Button) findViewById(R.id.bt_unbind);
        tv = (TextView) findViewById(R.id.tv);
        bt_bind.setOnClickListener(new View.OnClickListener() {

            @Override
            public void onClick(View v) {
                Intent intent = new Intent(MainActivity.this, MyService.class);
                bindService(intent, conn, Context.BIND_AUTO_CREATE);
                startService(intent);
            }
        });
        bt_unbind.setOnClickListener(new View.OnClickListener() {

            @Override
            public void onClick(View v) {
                unbindService(conn);
            }
        });
    }

    private ServiceConnection conn = new ServiceConnection() {

        @Override
        public void onServiceConnected(ComponentName name, IBinder service) {

            MyService.MyBinder binder = (MyBinder) service;
            tv.setText(binder.getCount() + "");
        }

        @Override
        public void onServiceDisconnected(ComponentName name) {
            // TODO Auto-generated method stub

        }
    };
}
MyService.java
public class MyService extends Service {

    private MyBinder mBinder = new MyBinder();
    private int count = 0;

    @Override
    public IBinder onBind(Intent intent) {
        // TODO Auto-generated method stub
        return mBinder;
    }

    @Override
    public void onCreate() {
        // TODO Auto-generated method stub
        super.onCreate();
    }

    @Override
    public int onStartCommand(Intent intent, int flags, int startId) {
        count = 100;
        return super.onStartCommand(intent, flags, startId);
    }

    @Override
    public void onDestroy() {
        super.onDestroy();
    }

    class MyBinder extends Binder {

        public int getCount() {
            return count;
        }
    }
}
我们在绑定服务的时候,将第三个参数设置为 Context.BIND_AUTO_CREATE,默认会自动创建服务,也就是调用服务的 onCreate 方法,但是并不会启动它,如果我们需要启动服务,还需要自己调用 startService 方法。
停止、解绑定服务
停止服务很简单,只需要调用 stopService 方法并传入响应的 Intent 即可。
如果我们想要让服务自己停止,只需要在需要停止的地方调用服务的 stopSelf 方法即可。
绑定服务需要调用 unBindService 方法,传入我们之前创建好的 ServiceConnection 对象。
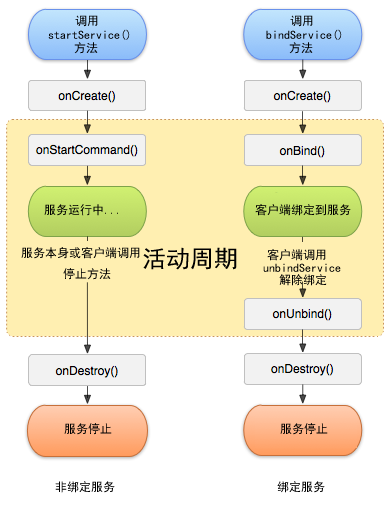
服务的生命周期
通过上面的内容,我们可以知道,服务的生命周期可以从启动-停止和绑定-解绑定两个方向来说。这两条路径并非完全独立,也就是说,在启动服务之后,也可以再进行绑定操作,反之亦然。
服务的整个生命周期从调用 onCreate 方法开始,到 onDestroy 结束,无论是直接启动服务还是绑定服务,都会调用 onCreate 和 onDestroy 方法。
服务的有效生命周期从调用 onStartConnand 或者 onBind 方法开始;对于启动服务来说,在调用 onDestroy 方法时结束,对于绑定服务来说,在 onUnbind 返回时结束。
下图描述了启动服务和绑定服务的生命周期:
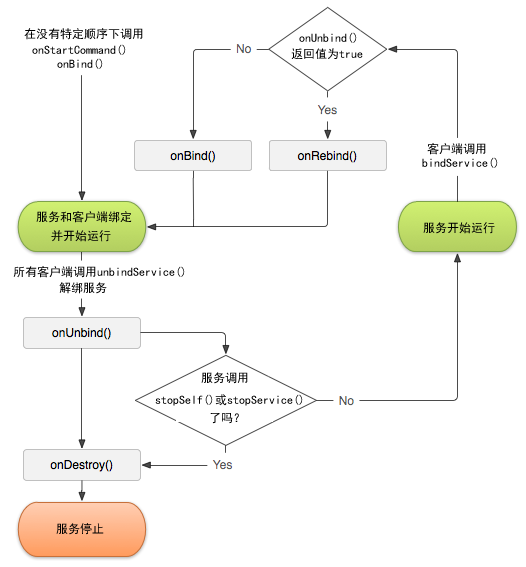
绑定服务的生命周期要更加复杂一些,我们来着重讲解一下。
绑定服务的生命周期
当服务与所有客户端之间的绑定全部取消时,Android 系统便会销毁服务(除非还使用 onStartCommand 启动了服务)。因此,如果您的服务是纯粹的绑定服务,则无需对其生命周期进行管理 —— Android 系统会根据它是否绑定到任何客户端代您管理。
不过,如果您选择实现 onStartCommand 回调方法,则您必须显式停止服务,因为系统现在已经将服务视为已启动。在此情况下,服务将一直运行到其通过 stopSelf() 自行停止,或其他组件调用 stopService() 为止,无论其是否绑定到任何客户端。
此外,如果您的服务已启动并接受绑定,则当系统调用您的 onUnbind() 方法时,如果您想在客户端下一次绑定到服务时接收 onRebind() 调用,则可选择返回 true。onRebind() 返回空值,但客户端仍在其 onServiceConnected() 回调中接收 IBinder。下图说明了这种生命周期的逻辑。
前台服务
我们之前说的服务都是运行在后台的,它一直默默的在后台工作着,服务的系统优先级是比较低的,当系统需要内训的时候,会回收掉正在运行的服务,如果我们希望服务一直运行,就可以考虑使用前台服务。
所谓的前台服务就是为我们的 Service 绑定一个 Notification,我们在 startCommand 方法中添加如下代码:
Notification.Builder builder = new Notification.Builder(this.getApplicationContext());
        Intent nfIntent = new Intent(this, MainActivity.class);
        builder.setContentIntent(PendingIntent.getActivity(this, 0, nfIntent, 0)).setLargeIcon(BitmapFactory.decodeResource(this.getResources(), R.mipmap.ic_launcher)).setContentTitle("下拉列表中的Title").setSmallIcon(R.mipmap.ic_launcher).setContentText("要显示的内容").setWhen(System.currentTimeMillis());
        Notification notification = builder.build();
        notification.defaults = Notification.DEFAULT_SOUND;
        startForeground(100, notification);
可以看到,我们并没有调用 NotificationManager 来启动 Notification,而是调用了 startForeground 方法,这个方法接收两个参数,第一个参数是通知的 ID,第二个参数值构建出来的 Nitification 对象,startForeground 方法会让我们的服务变成一个前台服务,并且将通知显示出来。
调用 stopForeground 可以将服务从前台删除。
特殊的 Service —— IntentService
我们先做一个实验,在 Activity 和 Service 中都打一个 Log,输出一下线程名称:
Log.d("TTT","activity thread:" + Thread.currentThread().getName());
我们会发现,Activity 和 Service 都是运行在 main 线程中的,这也就意味着我们直接创建的服务并不能执行耗时的工作。一般情况下,我们会直接创建一个 Thread 对象并 start 它,这样的做法是不可靠的,在 Activity 已经退出的情况下,此时它们所在的进程就变成了空进程,系统在内存紧张的时候会优先终止它,那么该进行内的所有子线程也都会被终止,这样就会导致子线程无法完成任务。
IntentService 正好可以弥补这个问题,当我们使用 Intent 请求启动一个 IntentService 时,IntentService 会将该 Intent 据爱如一个队列中,然后开启一条新的 worker 线程来处理该 Intent。
对于异步的 startService 请求,IntentService 会按照次序依次处理队列中的 Intent,该线程保证同一时刻只处理一个 Intent。
使用 IntentService 十分简单,直接继承 IntentService 然后实现其 onHandleIntent 方法即可,在 onHandleIntent 方法中执行我们的耗时操作即可。
例子:
public class MyIntentService extends IntentService {

    public MyIntentService(){
        super("MyItentService");
    }

    @Override
    protected void onHandleIntent(Intent intent) {
        Log.d("TTT","ThreadName = " + Thread.currentThread().getName());
        Log.d("TTT",intent.getStringExtra("string"));
        try {
            Thread.sleep(20000);
        } catch (InterruptedException e) {
            e.printStackTrace();
        }
        Log.d("TTT","耗时任务结束");
    }
}
参考资料
Android 官方文档
《第一行代码》
《疯狂 Android 讲义》