Jetpack —— 让 Navigation 来管理 Fragment
在 Android 中,我们使用 FragmentManager 和 FragmentTransaction 来管理 Fragment 之间的切换,使用 addToBackStack 来管理 Fragment 栈,Android 为了推广 Fragment,在 Jetpack 库中推出了 Navigation 组件,方便我们更好的管理 Fragment。
除了管理 Fragment 之间的切换,Navigation 还提供给了更强大的功能:
- 可视化的页面导航图,类似 xcode 中的 StoryBoard,便于我们看清页面之间的关系
- 通过 destination 和 action 来完成页面间的导航
- 方便的页面切换动画
- 页面间类型安全的参数传递
- 通过 NavigationUI 类,对菜单,底部导航,抽屉菜单导航进行方便统一的管理
- 深层链接
Android 大力推广 Jetpack,是不是代表着 Android 在推荐使用 Fragment 替代 Activity?
在学习 Navigation 之前,先明白几个概念:
Navigation Graph
一个 XML 文件,里面包含了应用中 Fragment 之间的关系
NavHostFragment
这是一种特殊的布局文件,Navigation Graph 中的页面通过该 Fragment 展示
NavController
用于在代码中完成 Navigation Graph 中具体的页面切换的对象
当我们要进行页面跳转时,使用 NavController 对象,告诉它你想要去 Navigation Graph 中的哪个页面,NavController 会将相关的页面展示在 NavHostFragment 中。
基础用法
第一步,创建 Navigation Graph
在 res 目录右键 New -> Android Resource File,输入文件名,然后 Resource Type 选择 Navigation,点击 OK 之后,系统会自动在 res 目录下生成一个 navigation 目录,里面就是我们刚才创建的资源文件 nav.xml:
<navigation xmlns:android="http://schemas.android.com/apk/res/android"
    xmlns:app="http://schemas.android.com/apk/res-auto"
    android:id="@+id/nav">

</navigation>
我们将在这个文件中描述各个 Fragment 之间的关系。
第二步,创建 Fragment 并添加到 Navigation Graph 中
创建 Fragment 的方法和之前一样:
布局
<RelativeLayout xmlns:android="http://schemas.android.com/apk/res/android"
    android:layout_width="match_parent"
    android:layout_height="match_parent"
    android:orientation="vertical">

    <TextView
        android:layout_width="wrap_content"
        android:layout_height="wrap_content"
        android:layout_centerInParent="true"
        android:text="这是第一个 Fragment"
        android:textColor="#FF0000"
        android:textSize="30sp" />
</RelativeLayout>
Fragment
package com.antonioleiva.mvpexample.app.navigation.fragmentlayout;

public class FirstFragment extends Fragment {
    @Nullable
    @Override
    public View onCreateView(@NonNull LayoutInflater inflater, @Nullable ViewGroup container, @Nullable Bundle savedInstanceState) {
        View view = inflater.inflate(R.layout.fragment_first, container, false);
        return view;
    }
}
在 Navigation Graph 中添加 Fragment
<navigation xmlns:android="http://schemas.android.com/apk/res/android"
    xmlns:app="http://schemas.android.com/apk/res-auto"
    xmlns:tools="http://schemas.android.com/tools"
    android:id="@+id/nav"
    app:startDestination="@id/firstFragment">

    <fragment
        android:id="@+id/firstFragment"
        android:name="com.antonioleiva.mvpexample.app.navigation.fragmentlayout.FirstFragment"
        android:label="fragment_first"
        tools:layout="@layout/fragment_first" />
</navigation>
第三步,创建 NavHostFragment
NavHostFragment 相当于一个 Fragment 的容器,编辑 Activity 的布局文件:
<RelativeLayout xmlns:android="http://schemas.android.com/apk/res/android"
    xmlns:app="http://schemas.android.com/apk/res-auto"
    xmlns:tools="http://schemas.android.com/tools"
    android:layout_width="match_parent"
    android:layout_height="match_parent"
    tools:context="com.antonioleiva.mvpexample.app.navigation.MainActivity">

    <fragment
        android:id="@+id/nav_host_fragment"
        android:name="androidx.navigation.fragment.NavHostFragment"
        android:layout_width="match_parent"
        android:layout_height="match_parent"
        app:defaultNavHost="true"
        app:navGraph="@navigation/nav" />
</RelativeLayout>
其中:
android:name固定为androidx.navigation.fragment.NavHostFragment,表明是一个 NavHostFragment。app:defaultNavHost值为true时,表示拦截返回键,即将返回交给 NavHostFragment 处理。app:navGraph将 NavHostFragment 与之前创建的 Navigation Graph 相关联。
就这样,一个简单的 Navigation 示例就完成了。
Fragment 之间跳转
一个简单的页面当然是不够的,Navigation 可以帮助我们实现 Fragment 之间的切换,再添加一个 Fragment 并按照刚才的方法添加到 Navigation Graph 中去
<navigation xmlns:android="http://schemas.android.com/apk/res/android"
    xmlns:app="http://schemas.android.com/apk/res-auto"
    xmlns:tools="http://schemas.android.com/tools"
    android:id="@+id/nav"
    app:startDestination="@id/firstFragment">


    <fragment
        android:id="@+id/firstFragment"
        android:name="com.antonioleiva.mvpexample.app.navigation.fragmentlayout.FirstFragment"
        android:label="fragment_first"
        tools:layout="@layout/fragment_first"/>
    <fragment
        android:id="@+id/secondFragment"
        android:name="com.antonioleiva.mvpexample.app.navigation.fragmentlayout.SecondFragment"
        android:label="fragment_second"
        tools:layout="@layout/fragment_second" />
</navigation>
怎么讲这两个 Fragment 联系在一起呢?在 nav.xml 的 Design 中选中 firstFragment,鼠标选中其右侧的圆圈,拖拽至右边的 secondFragment,松开鼠标,会发现两个 Fragment 连在一起了,而此时 Text 中的内容也变成了这样:
<navigation xmlns:android="http://schemas.android.com/apk/res/android"
xmlns:app="http://schemas.android.com/apk/res-auto"
xmlns:tools="http://schemas.android.com/tools"
android:id="@+id/nav"
app:startDestination="@id/firstFragment">


<fragment
    android:id="@+id/firstFragment"
    android:name="com.antonioleiva.mvpexample.app.navigation.fragmentlayout.FirstFragment"
    android:label="fragment_first"
    tools:layout="@layout/fragment_first">
    <action
        android:id="@+id/action_firstFragment_to_secondFragment2"
        app:destination="@id/secondFragment" />
</fragment>
<fragment
    android:id="@+id/secondFragment"
    android:name="com.antonioleiva.mvpexample.app.navigation.fragmentlayout.SecondFragment"
    android:label="fragment_second"
    tools:layout="@layout/fragment_second" />
</navigation>
你会发现在 firstFragment 中多了一个 action 节点,其中:
- id:系统自动生成,是这个 action 的 id,从名字上就可以看到这个 Action 是干什么的。
- destination:目标 Fragment 的 id。
接下来,修改一下 FirstFragment 的布局:
<RelativeLayout xmlns:android="http://schemas.android.com/apk/res/android"
    android:layout_width="match_parent"
    android:layout_height="match_parent"
    android:orientation="vertical">

    <TextView
        android:id="@+id/text"
        android:layout_width="wrap_content"
        android:layout_height="wrap_content"
        android:layout_centerInParent="true"
        android:text="这是第一个 Fragment"
        android:textColor="#FF0000"
        android:textSize="30sp" />

    <Button
        android:id="@+id/to_second_fragment"
        android:layout_width="match_parent"
        android:layout_height="wrap_content"
        android:layout_below="@id/text"
        android:text="跳转到 SecondFragment" />
</RelativeLayout>
之前说过了,在 Navigation 中,通过 NavController 完成 Fragment 切换,那么编辑下 FirstFragment:
public class FirstFragment extends Fragment {
    @Nullable
    @Override
    public View onCreateView(@NonNull LayoutInflater inflater, @Nullable ViewGroup container, @Nullable Bundle savedInstanceState) {
        View view = inflater.inflate(R.layout.fragment_first, container, false);
        Button button = view.findViewById(R.id.to_second_fragment);
        button.setOnClickListener(new View.OnClickListener() {
            @Override
            public void onClick(View v) {
                NavController controller = Navigation.findNavController(v);
                controller.navigate(R.id.action_firstFragment_to_secondFragment2);
            }
        });
        return view;
    }
}
上面是通过 Navigation.findNavController() 方法获取 NavController,系统提供了两种获取 NavController 的方法:
findNavController(Activity activity, int viewId):通过 Activity 及其包含的 View 获取 NavController。findNavController(View view):直接通过 View 获取 NavController。
然后调用 NavController 的 navigate 方法来完成切换,该方法的参数就是 Navigation Graph 中 Action 的 id。
app:defaultNavHost 属性的作用在这里就显示出来了,当该属性值为 true 时,表示返回键受到 Navigation 接管,在 SecondFragment 点击返回键,会返回到 FirstFragment;该属性值为 false 时,点击返回键会直接退出 Activity。
添加切换动画
首先,在 res/anim 文件夹下加入常见的动画文件,动画文件的写法跟 Activity 动画的写法一样,这里不赘述,系统也提供了几个默认的动画效果可以使用。
点击两个关联 Fragment 之间的连线,就可以在右边的 Animations 就可以指定切换动画,如图所示:
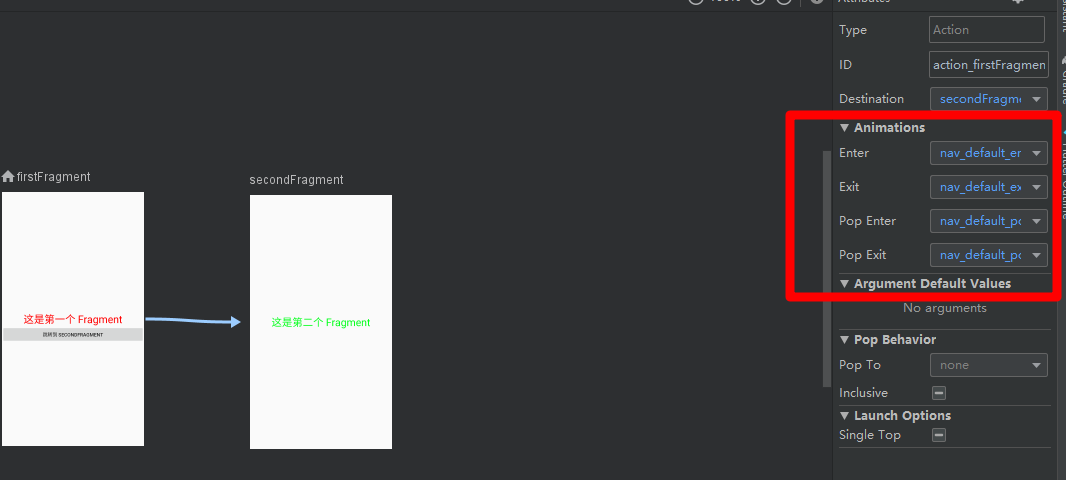
其中:
- enterAnim 和 exitAnim 是去往栈里添加一个 destination 时两个 destination 的动画
- popEnterAnim 和 popExitAnim 是从栈里移除一个 destination 时的动画。
共享组件
除了切换动画之外,Navigation 还支持 Fragment 之间的元素共享,但元素共享只能通过代码方式添加,因为它包含共享的 View 实例。
每种类型的目标都通过 Navigator.Extras 接口的子类实现此编程 API。 Extras 被传递给 navigate() 调用。
FragmentNavigator.Extras extras = new FragmentNavigator.Extras.Builder()
    .addSharedElement(imageView, "header_image")
    .addSharedElement(titleView, "header_title")
    .build();
Navigation.findNavController(view).navigate(R.id.details,
    null, // Bundle of args
    null, // NavOptions
    extras);
传递数据
Fragment 之间传递参数有两种方法:
使用
navigate(@IdRes int resId, @Nullable Bundle args)方法传递一个 Bundle 参数,Bundle 对象携带着要传递的数据,这种方式也就限制了可传递的数据类型为:- 基本数据类型
- 可以被序列化的对象。
- 资源(必须是
@resourceType/resourceName格式的)
目标 Fragment 可以使用
getArguments()方法获取到传递过来的 Bundle 对象。类型安全的传递方式。
这种方式需要添加依赖:
       dependencies {
           classpath "android.arch.navigation:navigation-safe-args-gradle-plugin:1.0.0-alpha01"
       }
xml
   apply plugin: 'androidx.navigation.safeargs'
添加这个依赖,需要项目是 AndroidX 的,如果不是,会抛出异常:
Cause: androidx.navigation.safeargs can only be used with an androidx project
添加完依赖之后编辑 NavigationGraph 文件,例如我们想要像 SecondFragment 传递一个名为 Address 的参数:
       <fragment
           android:id="@+id/secondFragment"
           android:name="com.antonioleiva.mvpexample.app.navigation.fragmentlayout.SecondFragment"
           android:label="fragment_second"
           tools:layout="@layout/fragment_second">
           <argument
               android:name="Address"
               android:defaultValue="未设置"
               app:argType="string" />
       </fragment>
可以看到添加了一个 argument 项,其中:
- name:属性名
- defaultValue:默认值
argType:数据类型
然后 rebuild 一下项目,就会发现在
GeneratedJava目录下多了两个文件:FirstFragmentDirections
SecondFragmentArgs
这两个文件是自动生成的,不用理会,如果没有自动生成,就需要检查一下究竟是哪一步做错了。
然后发送数据也很简单:
   FirstFragmentDirections.ActionFirstFragmentToSecondFragment2 action = FirstFragmentDirections.actionFirstFragmentToSecondFragment2();
   action.setAddress("北京市昌平区");
   Navigation.findNavController(v).navigate(action);
接受数据:
   Bundle arguments = getArguments();
           if (arguments != null) {
               String address = SecondFragmentArgs.fromBundle(arguments).getAddress();
           }
深层链表(DeepLink)
Navigation 组件提供了对深层链接(DeepLink)的支持。通过该特性,我们可以利用 PendingIntent 或者一个真实的 URL 链接,直接跳转到应用程序的某个 destination(Fragment/Activity)。
最常见的两种使用场景:
PendingIntent 的方式。当你的应用程序收到某个通知推送,你希望用户在点击该通知时,能够直接跳转到展示该通知内容的页面,那么就可以通过 PendingIntent 来完成此操作。
URL 的方式。当用户在手机 Web 页面上浏览我们网站上的某个页面时,我们可以在网页上放置一个类似“在应用内打开”的按钮。当用户的手机安装有你的应用程序,通过 deepLink 就能打开相应的页面,如果没有安装,那么我们的网站可以导航到应用程序的下载页面,从而引导用户安装应用程序。
下面举例来说明这两种情况的使用方式:
1.PendingIntent
通过 sendNotification() 方法,向通知栏发送一条通知,发送通知的时候需要设置 PendingIntent。
   /**
    * 向通知栏发送一个通知
    * */
   private void sendNotification()
   {
       if(getActivity() == null)
       {
           return;
       }

       if (Build.VERSION.SDK_INT >= Build.VERSION_CODES.O)
       {
           int importance = NotificationManager.IMPORTANCE_DEFAULT;
           NotificationChannel channel = new NotificationChannel(CHANNEL_ID, "ChannelName", importance);
           channel.setDescription("description");
           NotificationManager notificationManager = getActivity().getSystemService(NotificationManager.class);
           notificationManager.createNotificationChannel(channel);
       }

       NotificationCompat.Builder builder = new NotificationCompat.Builder(getActivity(), CHANNEL_ID)
               .setSmallIcon(R.drawable.ic_launcher_foreground)
               .setContentTitle("DeepLinkDemo")
               .setContentText("Hello World!")
               .setPriority(NotificationCompat.PRIORITY_DEFAULT)
               .setContentIntent(getPendingIntent())//设置PendingIntent
               .setAutoCancel(true);

       NotificationManagerCompat notificationManager = NotificationManagerCompat.from(getActivity());
       notificationManager.notify(notificationId, builder.build());
   }
构建一个 PendingIntent 对象,在其中设置,当通知被点击后需要跳转到的 destination 及传递的参数。
   /**
    * 通过PendingIntent设置,当通知被点击后需要跳转到哪个destination,以及传递的参数
    * */
   private PendingIntent getPendingIntent()
   {
       if(getActivity() != null)
       {
           Bundle bundle = new Bundle();
           bundle.putString("params", "from Notification");
           return Navigation
                   .findNavController(getActivity(), R.id.sendNotification)
                   .createDeepLink()
                   .setGraph(R.navigation.graph_deep_link_activity)
                   .setDestination(R.id.deepLinkSettingsFragment)
                   .setArguments(bundle)
                   .createPendingIntent();
       }
       return null;
   }
2.URL
这种方式也很简单。
第一步:在导航图中为 destination 添加 <deepLink/> 标签。
注意:
app:uri属性中填入的是你的网站的相应 web 页面地址,后方的参数会通过 Bundle 对象传递到 destination 中
<fragment
          android:id="@+id/deepLinkSettingsFragment"
          android:name="com.michael.deeplinkdemo.DeepLinkSettingsFragment"
          android:label="fragment_deep_link_settings"
          tools:layout="@layout/fragment_deep_link_settings">

    <!-- 为destination添加<deepLink/>标签 -->
    <deepLink app:uri="www.YourWebsite.com/{params}" />

</fragment>
第二步:为相应的Activity设置 <nav-graph/> 标签,这样,当用户在 Web 中访问到你的网站时,你的应用程序便能监听到
<application
             android:allowBackup="true"
             android:icon="@mipmap/ic_launcher"
             android:label="@string/app_name"
             android:roundIcon="@mipmap/ic_launcher_round"
             android:supportsRtl="true"
             android:theme="@style/AppTheme">
    <activity android:name=".DeepLinkActivity">
        <intent-filter>
            <action android:name="android.intent.action.VIEW" />
            <action android:name="android.intent.action.MAIN"/>
            <category android:name="android.intent.category.LAUNCHER"/>
        </intent-filter>

        <!-- 为Activity设置<nav-graph/>标签 -->
        <nav-graph android:value="@navigation/graph_deep_link_activity" />

    </activity>

</application>
第三步:测试
我们可以在 Google app 中输入相应的 Web 地址,也可以通过 adb 工具,使用命令行来完成操作
adb shell am start -a android.intent.action.VIEW -d "http://www.YourWebsite.com/fromWeb"
执行该命令,你的手机便能直接打开 deepLinkSettingsFragment。在该 Fragment 中,我们可以通过 Bundle 对象获取相应的参数(fromWeb),从而完成后续的操作。
   @Override
   public View onCreateView(LayoutInflater inflater, ViewGroup container, Bundle savedInstanceState)
   {
       View view = inflater.inflate(R.layout.fragment_deep_link_settings, container, false);
       Bundle bundle = getArguments();
       if(bundle != null)
       {
           String params = bundle.getString("params");
           TextView tvDesc = view.findViewById(R.id.tvDesc);
           if(!TextUtils.isEmpty(params))
           {
               tvDesc.setText(params);
           }
       }
       return view;
   }
本部分内容转载自 Navigation(四)DeepLink的使用
NavigationUI
Fragment 的切换,除了 Fragment 页面本身的切换,通常还伴有 App bar 的变化。为了方便统一管理, Navigation 组件引入了 NavigationUI 类。通过这篇文章,我们来看看如何使用 NavigationUI 来对 App bar 和页面切换进行管理。
App bar的管理
NavigationUI 提供了 setupActionBarWithNavController 方法,将 App bar 与 NavController 绑定,这样,当 NavController 为你完成 Fragment 切换时,系统会自动为你在 App bar 中完成一些常见操作。比如,当你切换到一个新的 Fragment 时,系统会自动在 App bar 的左侧添加返回按钮,响应返回事件等。
NavigationUI 对三种类型的 App bar 提供了支持:
- Toolbar
- ActionBar
- CollapsingToolbarLayout
我们来看 NavController 具体如何与 App bar 绑定。以 ActionBar 为例:
appBarConfiguration = new AppBarConfiguration.Builder(navController.getGraph()).setDrawerLayout(drawerLayout).build();
NavigationUI.setupActionBarWithNavController(this, navController, appBarConfiguration);
通过 AppBarConfiguration 类,我们可以对 App bar 进行配置
通过 NavigationUI.setupActionBarWithNavController() 方法,将 App bar 与 NavController 绑定
注意:对于CollapsingToolbarLayout/Toolbar也有类似的绑定方法
Fragment的管理
常见的 Fragment 切换通常是通过菜单来完成的,菜单通常有三种形式:
- App bar 左侧的抽屉菜单(DrawLayout + NavigationView)
- App bar 右侧的菜单(menu)
- 底部菜单(BottomNavigationView)
当我们在导航图中为 Fragment 页面添加 id 后,在对应的 menu 中,也为其指定相同的 id,那么,当菜单被点击时,系统会为我们自动切换 Fragment。
与此同时,NavController 提供了一个名为 OnDestinationChangedListener 的接口,对 Destination 切换事件进行监听。
navController.addOnDestinationChangedListener(new NavController.OnDestinationChangedListener()
{
    @Override
    public void onDestinationChanged(@NonNull NavController controller, @NonNull NavDestination destination, @Nullable Bundle arguments)
    {
        Toast.makeText(DrawerLayoutActivity.this, "onDestinationChanged() called", Toast.LENGTH_SHORT).show();
    }
});
以上便是 NavigationUI 的核心内容。相关代码量较大,这里不再叙述。我通过项目的方式为大家演示三种形式的菜单页面切换。
项目地址:NavigationUIDemo
本节内容转载自:Navigation(三)NavigationUI的使用
哦,忘了写添加依赖了:
    implementation "androidx.navigation:navigation-fragment:2.1.0-beta02"
    implementation "androidx.navigation:navigation-ui:2.1.0-beta02"